Select analysis version to view the applicable content:
The MindWare analysis applications have the ability to open AcqKnowledge (.acq) files directly, but there are a few caveats:
- All channels must be visible or not hidden
- All channels must be sampled at the same sample rate
- All channels must be in volts (or values within the input range expected by MindWare applications)
- The data must be viewed in seconds, rather than absolute time or frequency
- The file must be saved as an AcqKnowledge 3 Graph
- The adjusted channels and scaling must be used in the MindWare applications
This article will provide instructions on how to modify your AcqKnowledge files to meet these criteria.
Step 1: Show (unhide) all channels
If the .acq file contains hidden channels, the hidden channels will need to be shown. You can unhide the channel by holding down the Alt key on your keyboard and clicking on the hidden channel number which is “2” in this case.

Below is the same file with channel “2” shown.

Please repeat this step for all hidden channels before continuing.
Step 2: Adjusting the Sample Rate
If your .acq file contains only one data channel, you can proceed to Step 3.
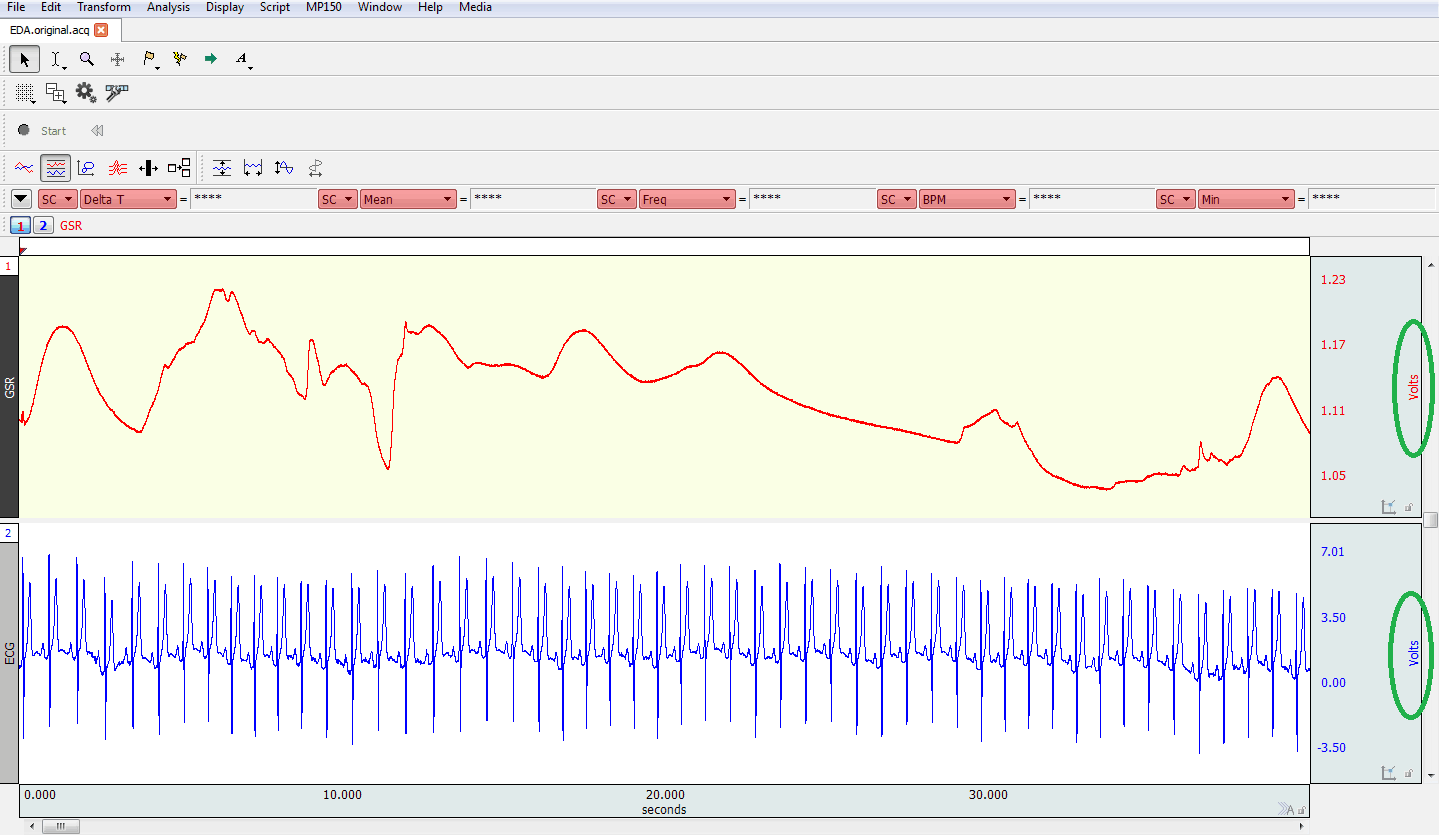
If the .acq file contains more than one data channel, e.g., GSC and ECG, then some additional steps must be taken to ensure that all of the waveforms are sampled at the same rate before opening the file in a MindWare application.
To check the sample rate of the channels, hover the mouse over the title of the channel and a dialog box will appear with the sample rate information as seen in the image below.
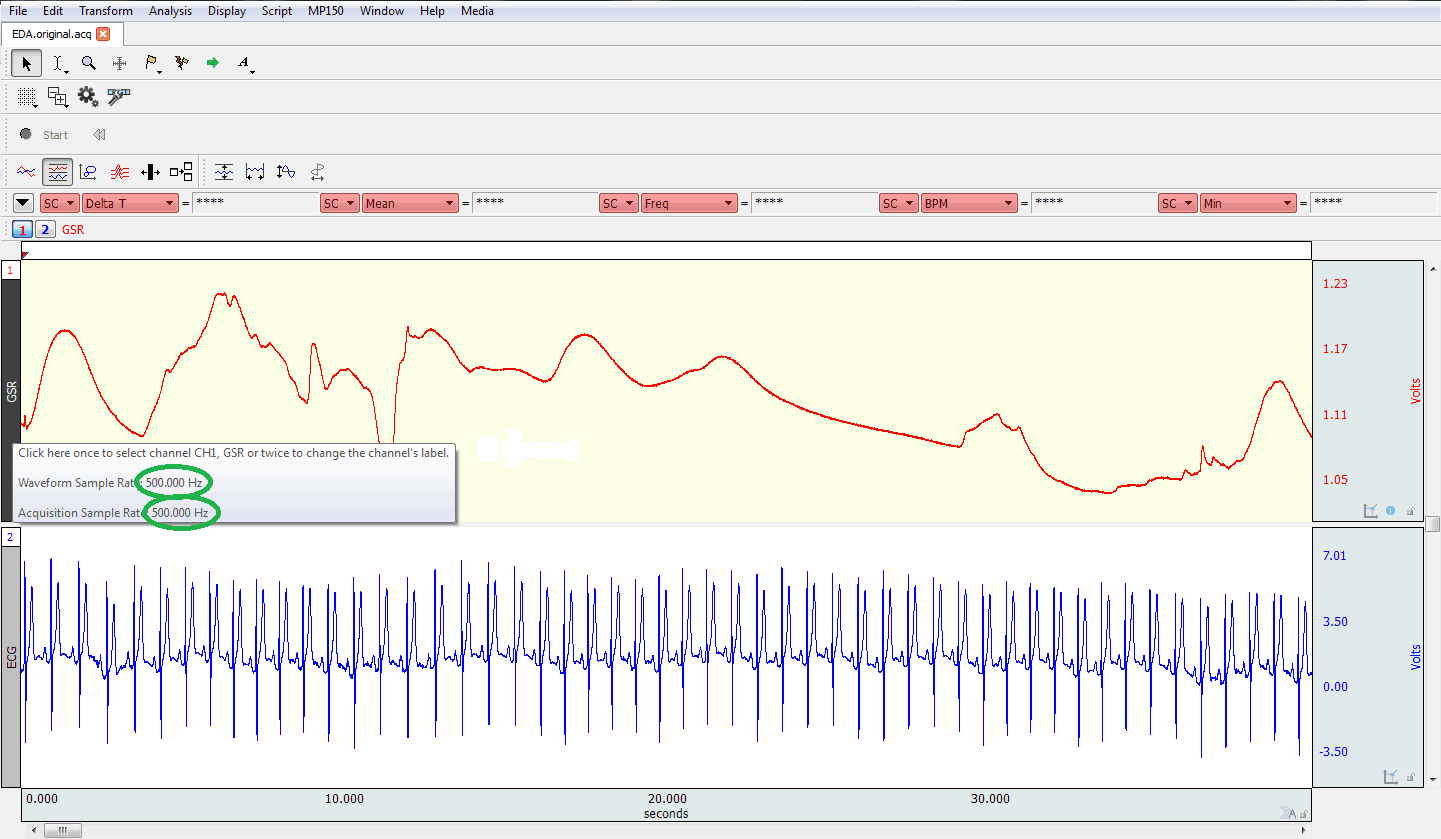
This waveform currently has a sample rate of 500 Hz. Also, a sample rate of 500 Hz was used during acquisition for this example.
If all of the measures are already the same sample rate, proceed to Step 3.
Step 2A – Determine the highest sample rate:
By hovering over the other channel title we can see that this measure is currently sampled at 1 kHz.
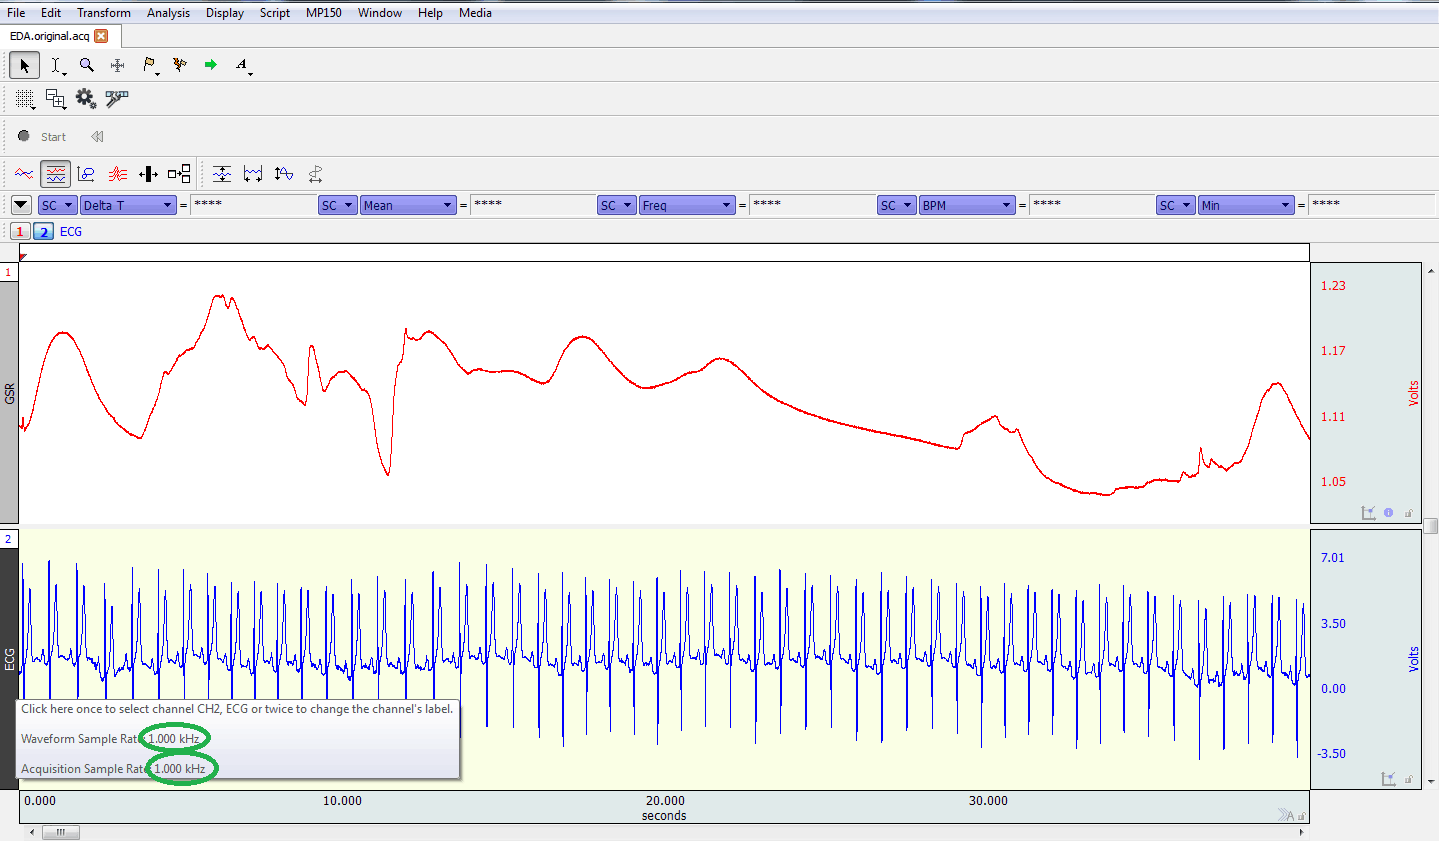
Because the two channels were sampled at a different rate we need to re-sample them to the same sample rate. Since the ECG channel was sampled at 1 kHz (1000 samples per second), we will up-sample the GSR channel from 500 Hz (500 samples per second) to 1 kHz.
Step 2B – Re-sample all channels to the highest sample rate:
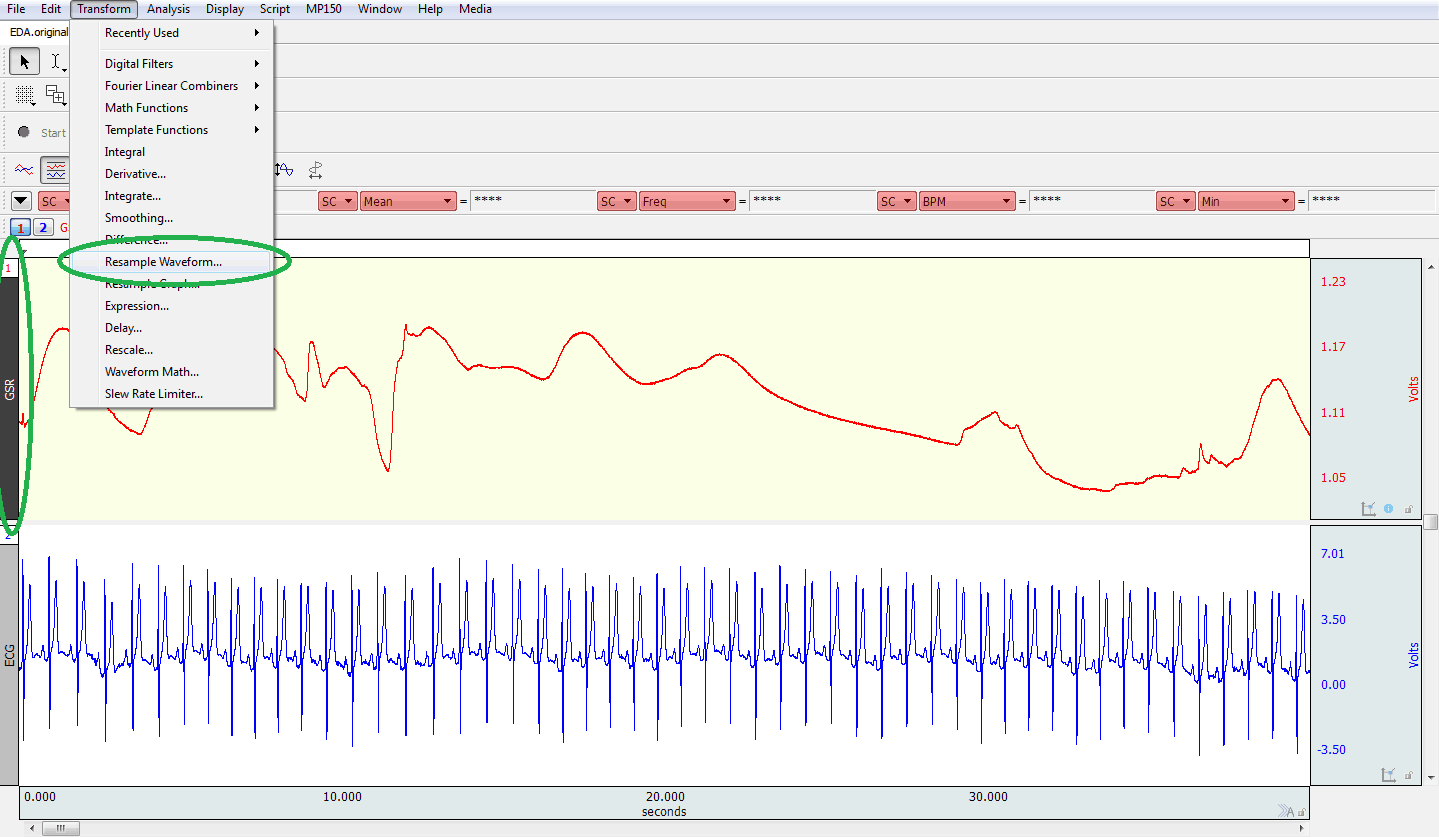
To re-sample a waveform, first ensure that the channel that you would like to re-sample is selected. Then, navigate to the “Transform” menu at the top of the screen and select “Resample Waveform…”.
Once “Resample Waveform…” is selected a new window will appear. In this window you will select the new desired sample rate.
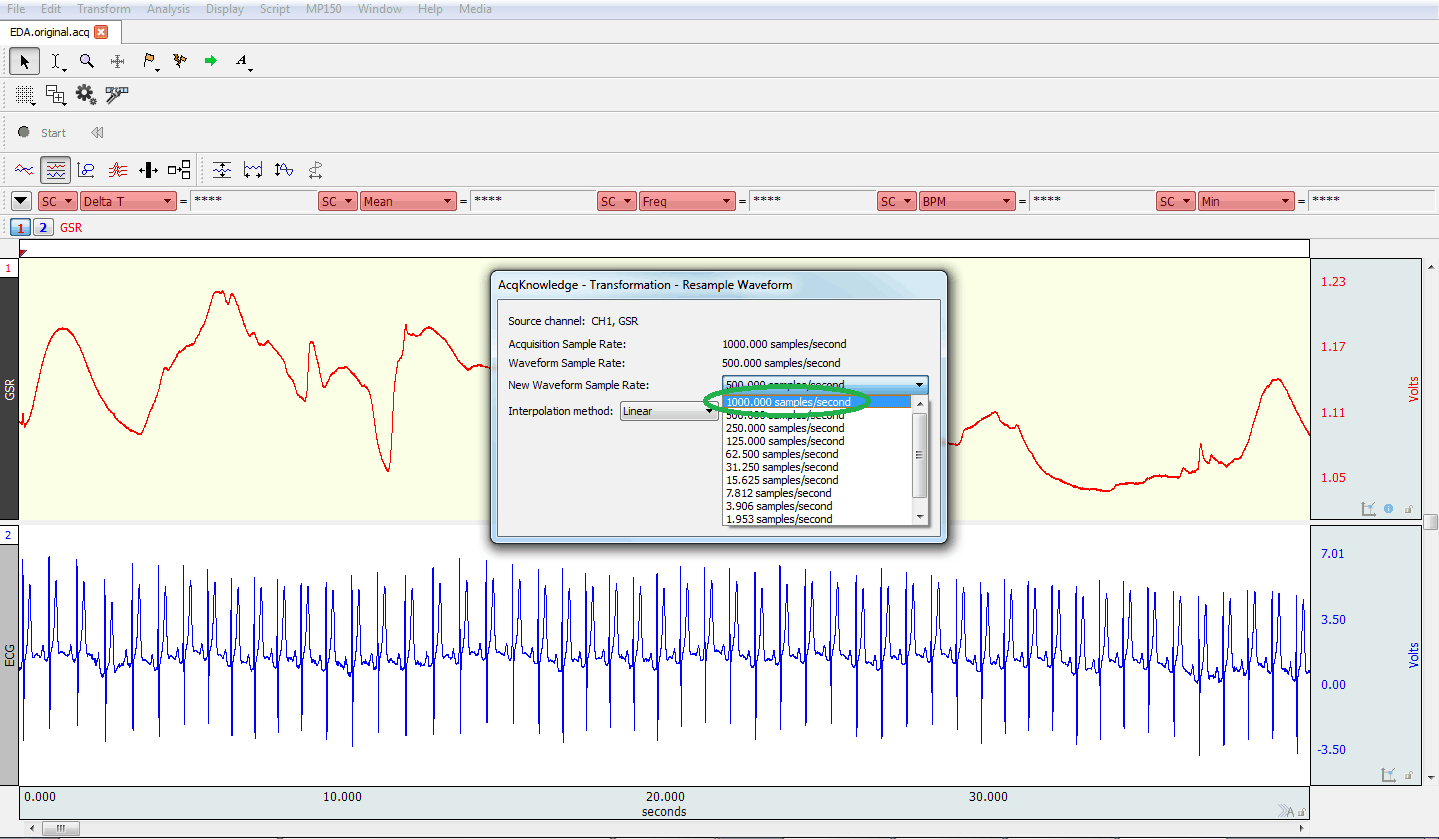
Again, a sample rate of 1000 samples/second was chosen for this example as this will match the higher sample rate of the ECG signal below it. This step must be repeated for each waveform in this file.
After all of the channels have the same sampling rate, continue on to Step 3.
Step 3: Adjusting the Channel Scaling
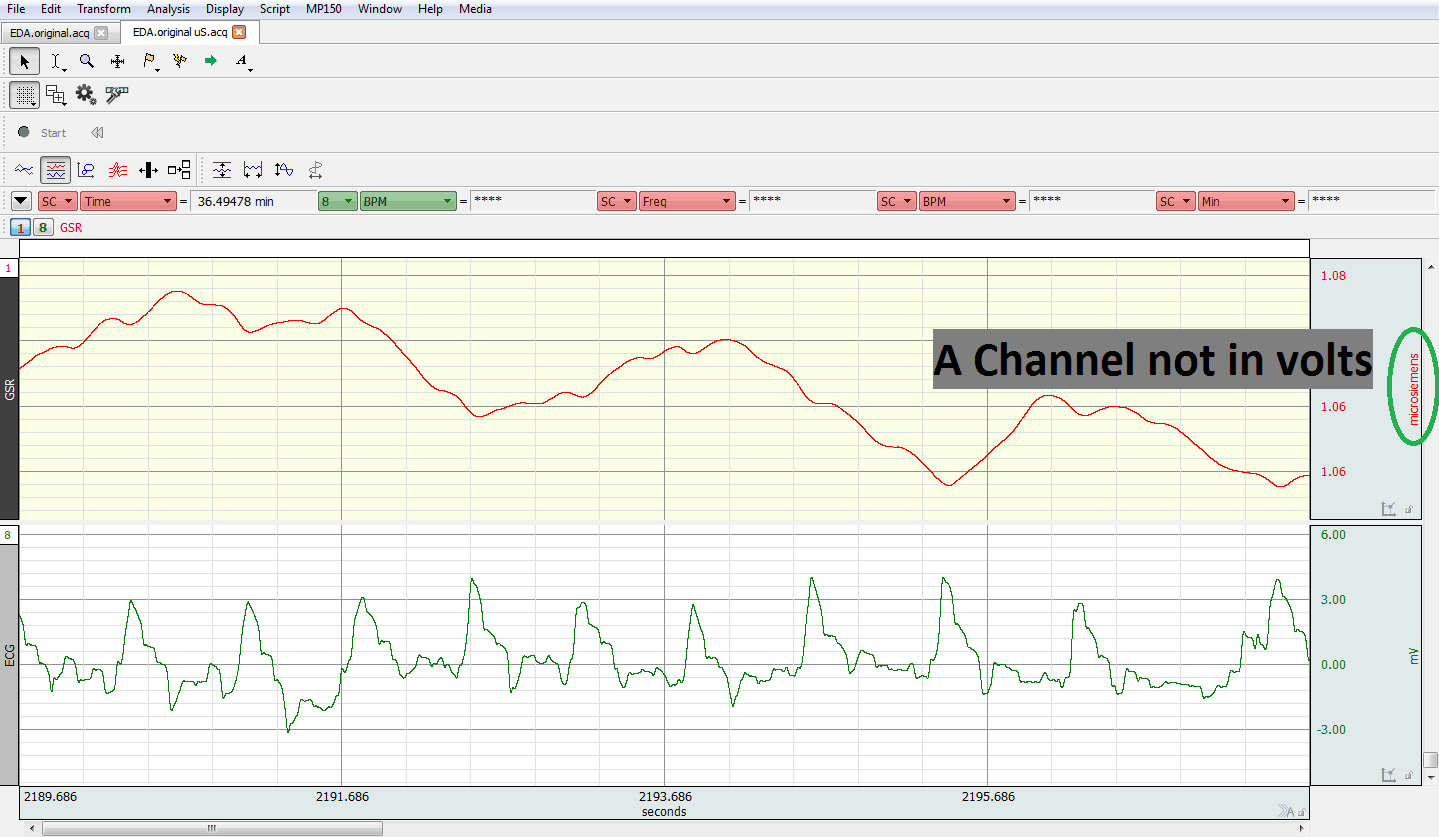
If all channels the AcqKnowledge file are scaled in volts, then skip to Step 4.
If the data is measured in a scale other than volts (ohms, uS, degrees, etc.), than these data need to be converted back to volts using waveform math in AcqKnowledge.
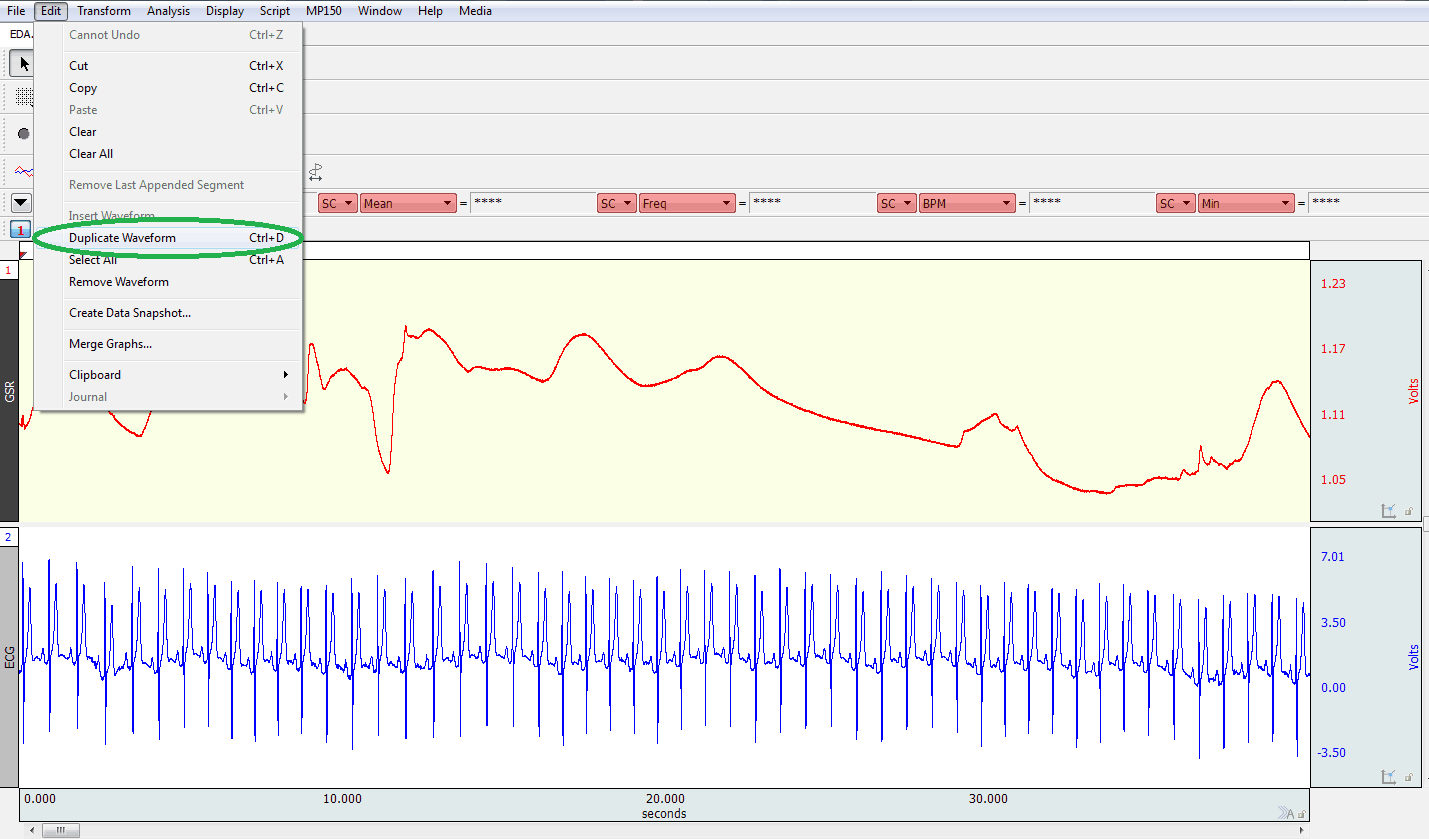
Step 3A – Duplicate the channel:
First, duplicate the channels that are being converted so that the original channel is not modified. This is done so that, in the event something goes wrong during the scaling, the original data is left untouched.
To duplicate a channel, first highlight it by clicking on the channel title and then navigate to the Edit menu at the top of the screen and select “Duplicate Waveform”. You may also use the hot key function “Ctrl+D”.
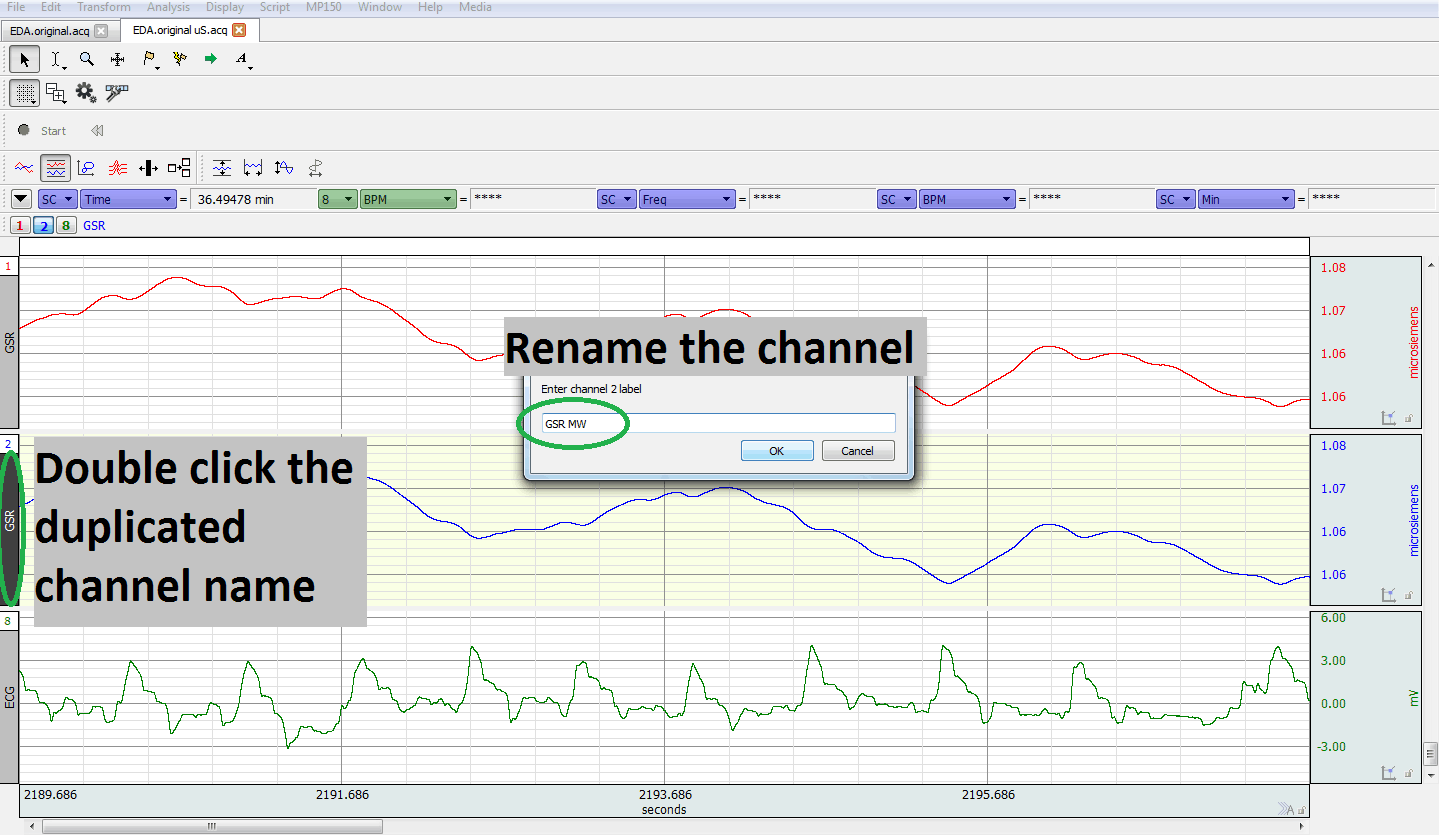
The image below shows both the original and duplicated channel. Now it is a good idea to rename the duplicate channel so that they are not confused.
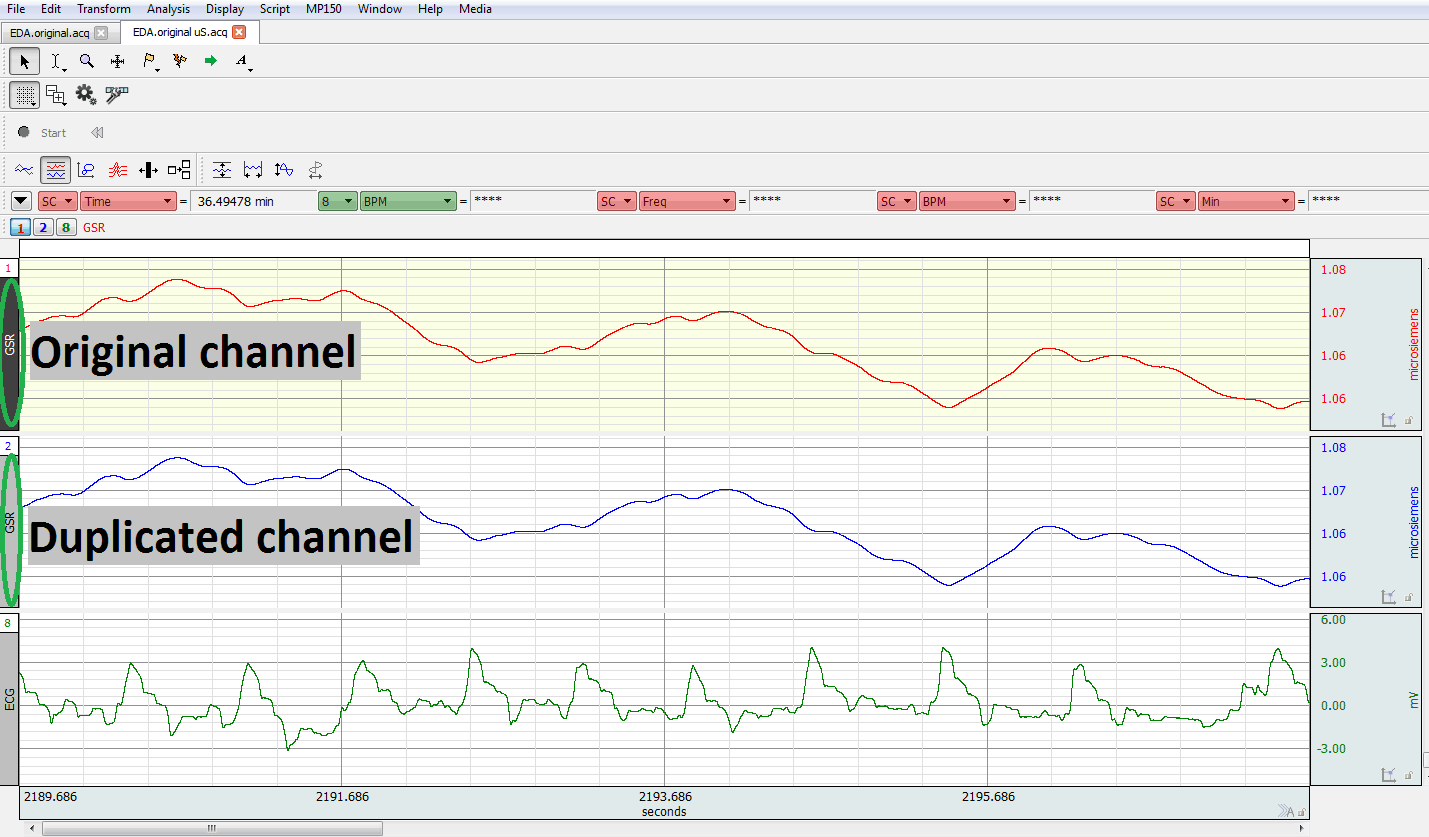
Rename the channel by double clicking on the channel title. This channel has been renamed by adding “MW” (for MindWare) to the already existing title.
Step 3B – Perform the scaling:
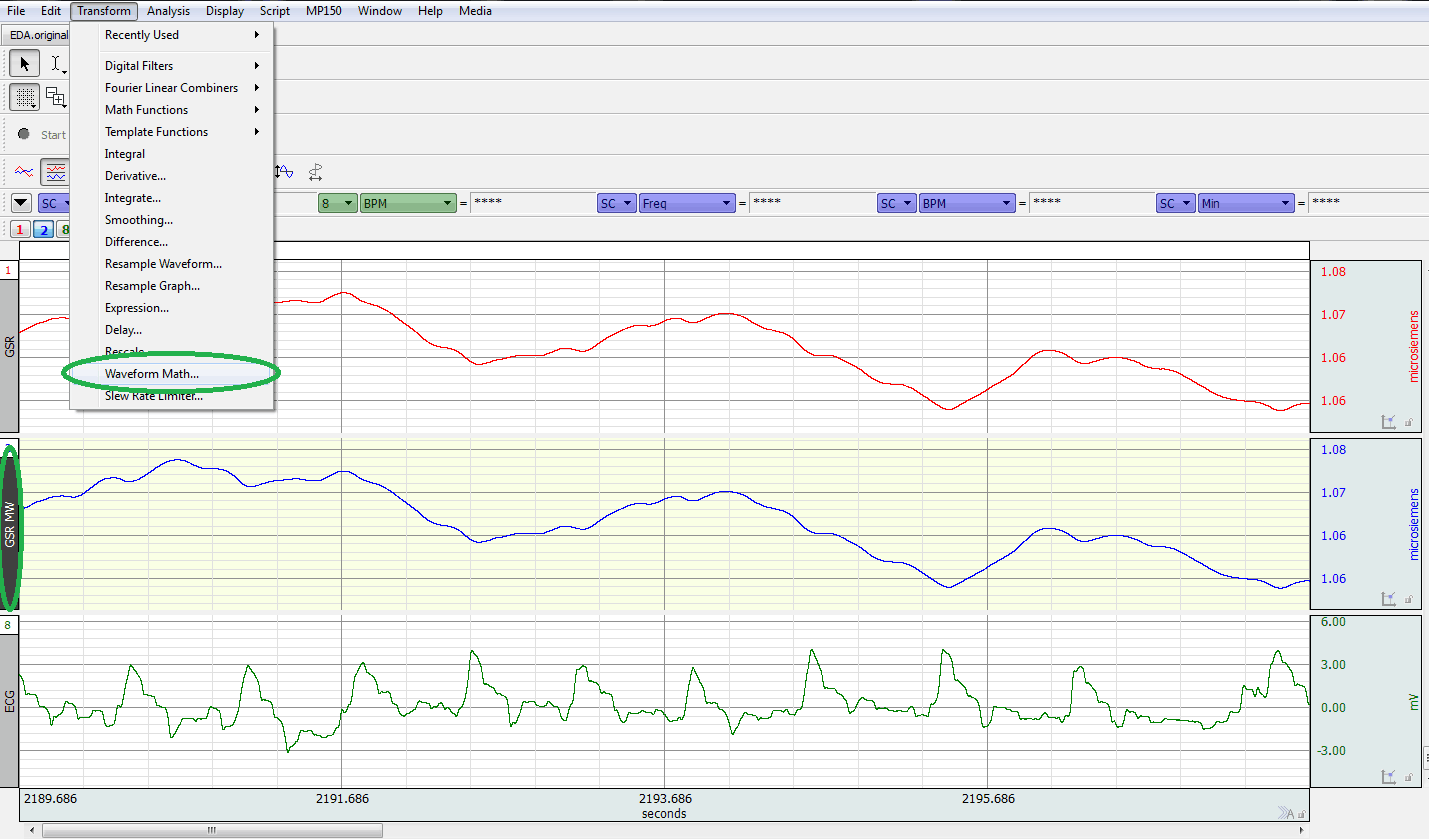
With the duplicated channel selected, navigate to the “Transform” menu at the top of the screen and select “Waveform Math…”.
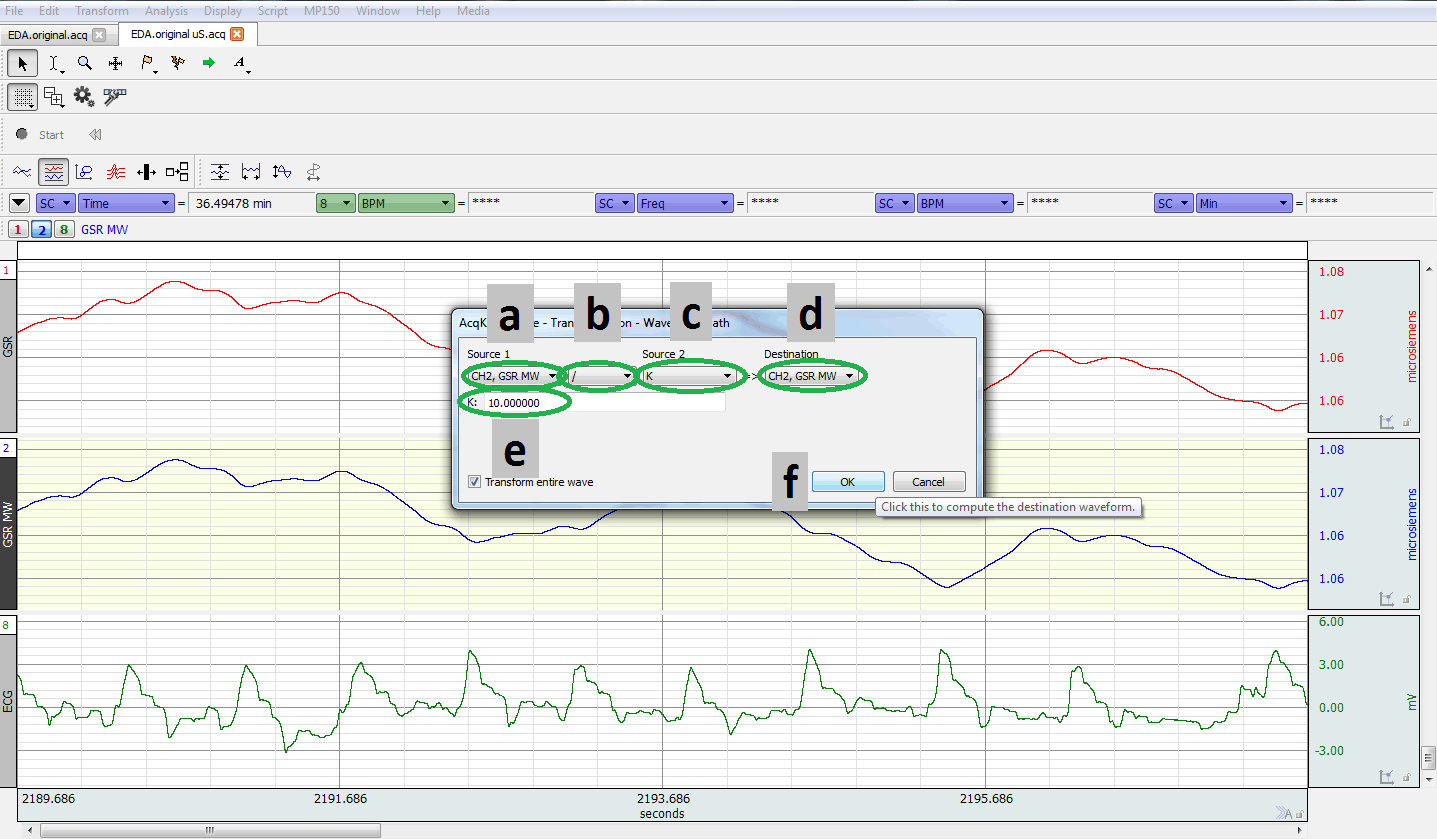
On the “Waveform Math…” screen:
a – Ensure that Source 1 is your duplicated channel (with the MW ending). If it is not, then you must select the duplicated channel from the drop down menu.
b – Select division (or multiply, depending on the scaling needs) as the operation
c – Select “K” for Source 2
d – Ensure the destination matches the Source 1 field
e – Enter in the value that scales your data to volts for the “K” field
For demonstration purposes a value of 10 was used. This may not be the appropriate value for every case. Please refer to your BIOPAC hardware manual for scaling values.
If the scaling values are unavailable, scale the data so that it all falls between -10 and 10 (the maximum input voltage range expected by the MindWare analysis applications). Write down the value used for this scaling, as you need it to re-scale your data later in MindWare.
f: Press OK when finished
This step must be repeated for each waveform in the file that is not scaled in volts.
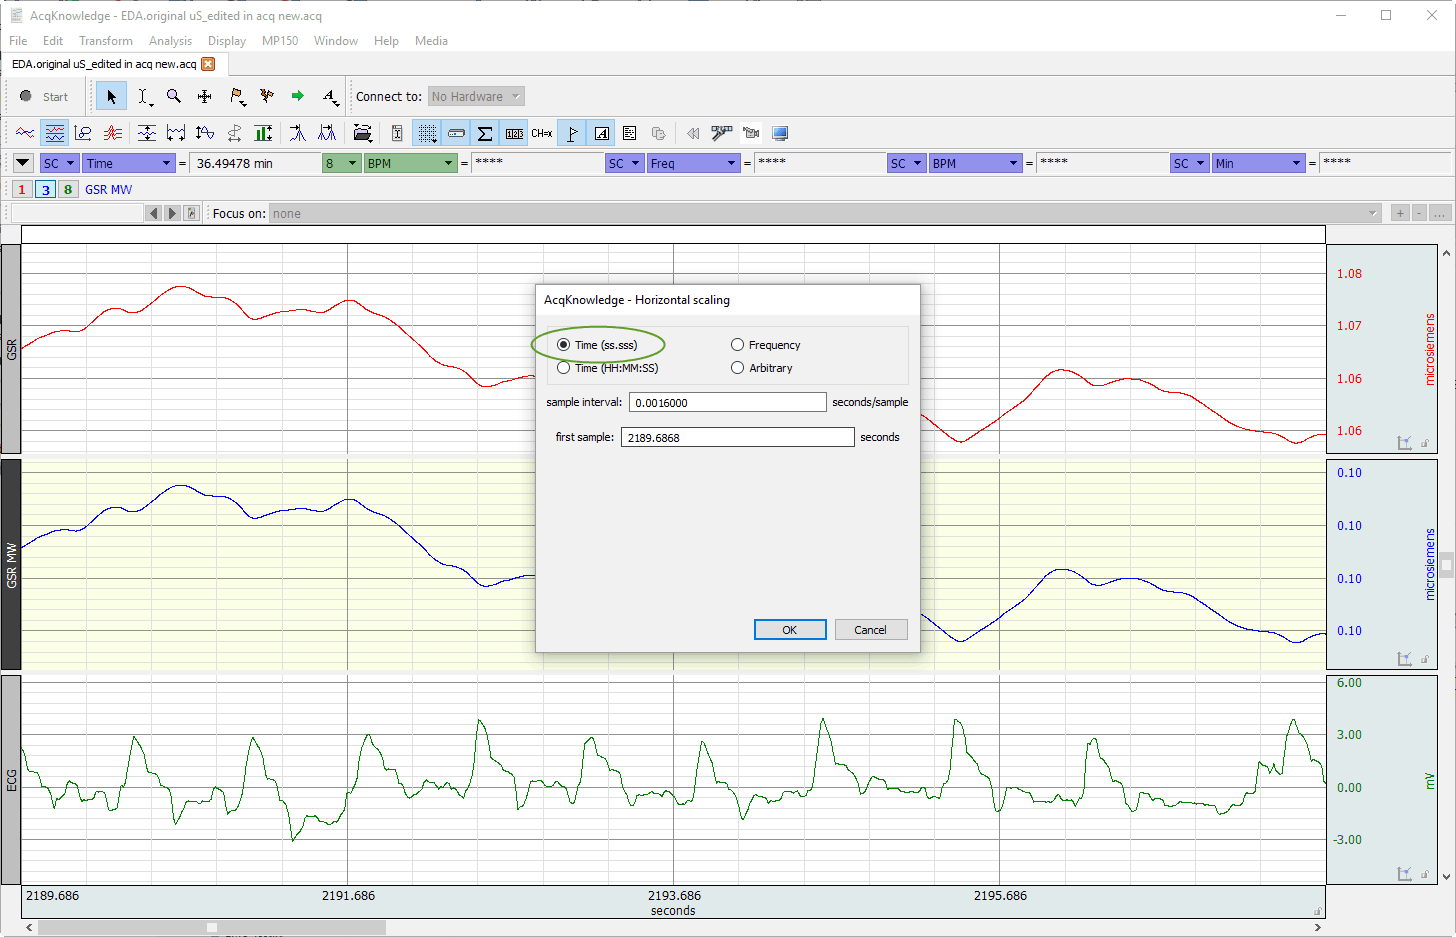
Step 4 – Set Horizontal Axis
The Horizontal Scaling settings in AcqKnowledge affect the way the sample rate is stored in the file. To read the file properly in MindWare, the horizontal scale must be shown in seconds. To change this, navigate to the Display menu and select “Horizontal Axis…”.
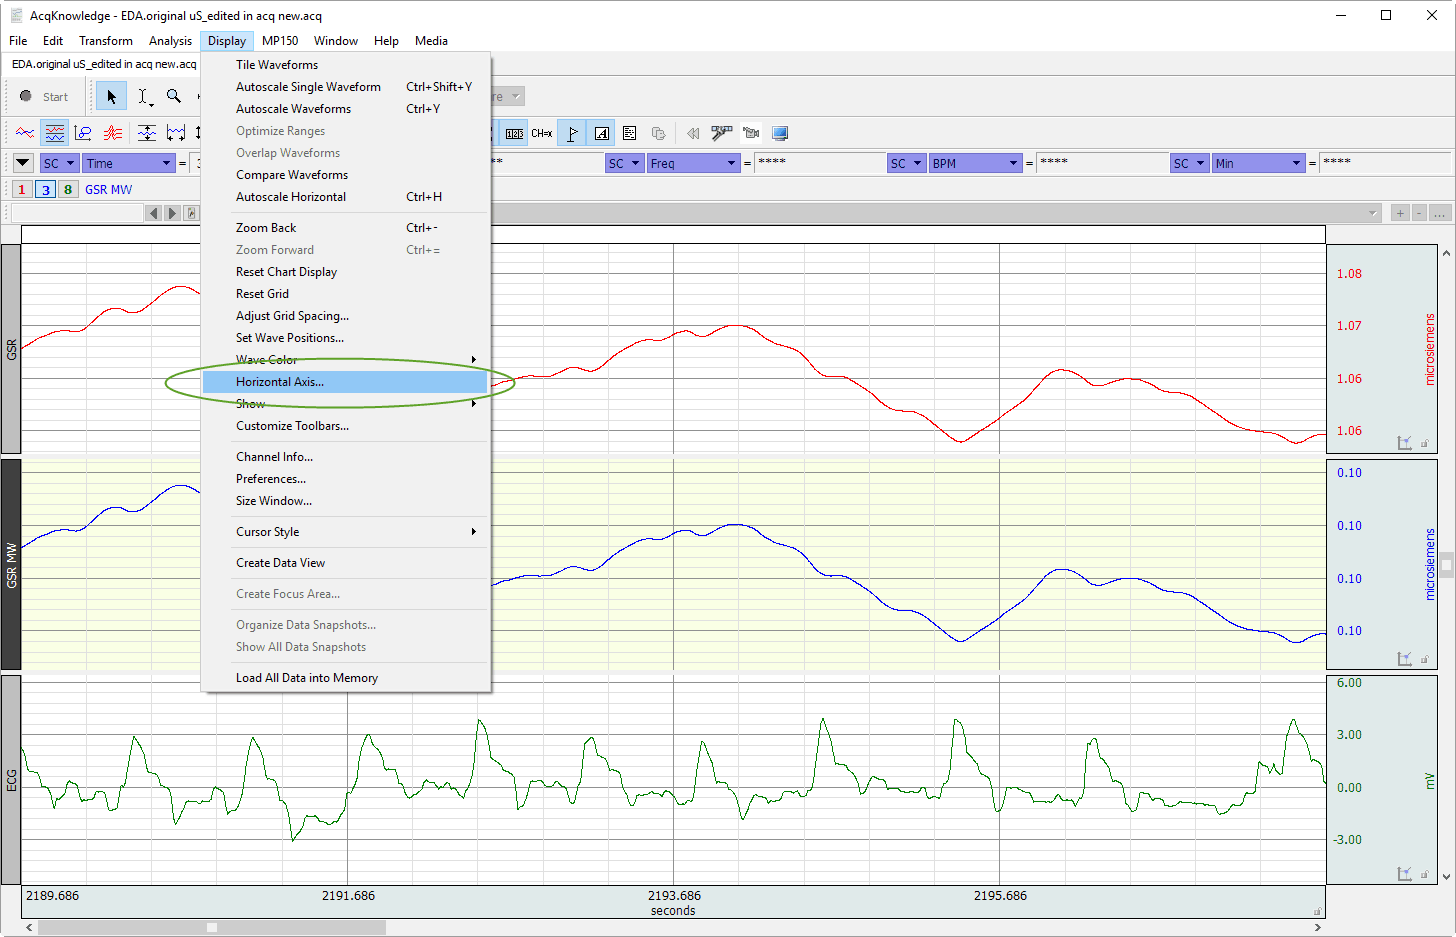
On this screen, ensure that the Horizontal Scaling is set to “Time (ss.sss)” and press OK.
Step 5 – Save the file as an AcqKnowledge 3 Graph:
If you are using AcqKnowledge 3.9 or earlier, you can skip this step.
MindWare analysis applications cannot open the default file type created by AcqKnowledge 4.0 or newer, however there is an option to save these files in the older AcqKnowledge 3 file format.
Navigate to the File menu and select “Save As…”. Click on the drop down menu for “Save as type:” and select “Windows AcqKnowledge 3 Graph (*acq)”.
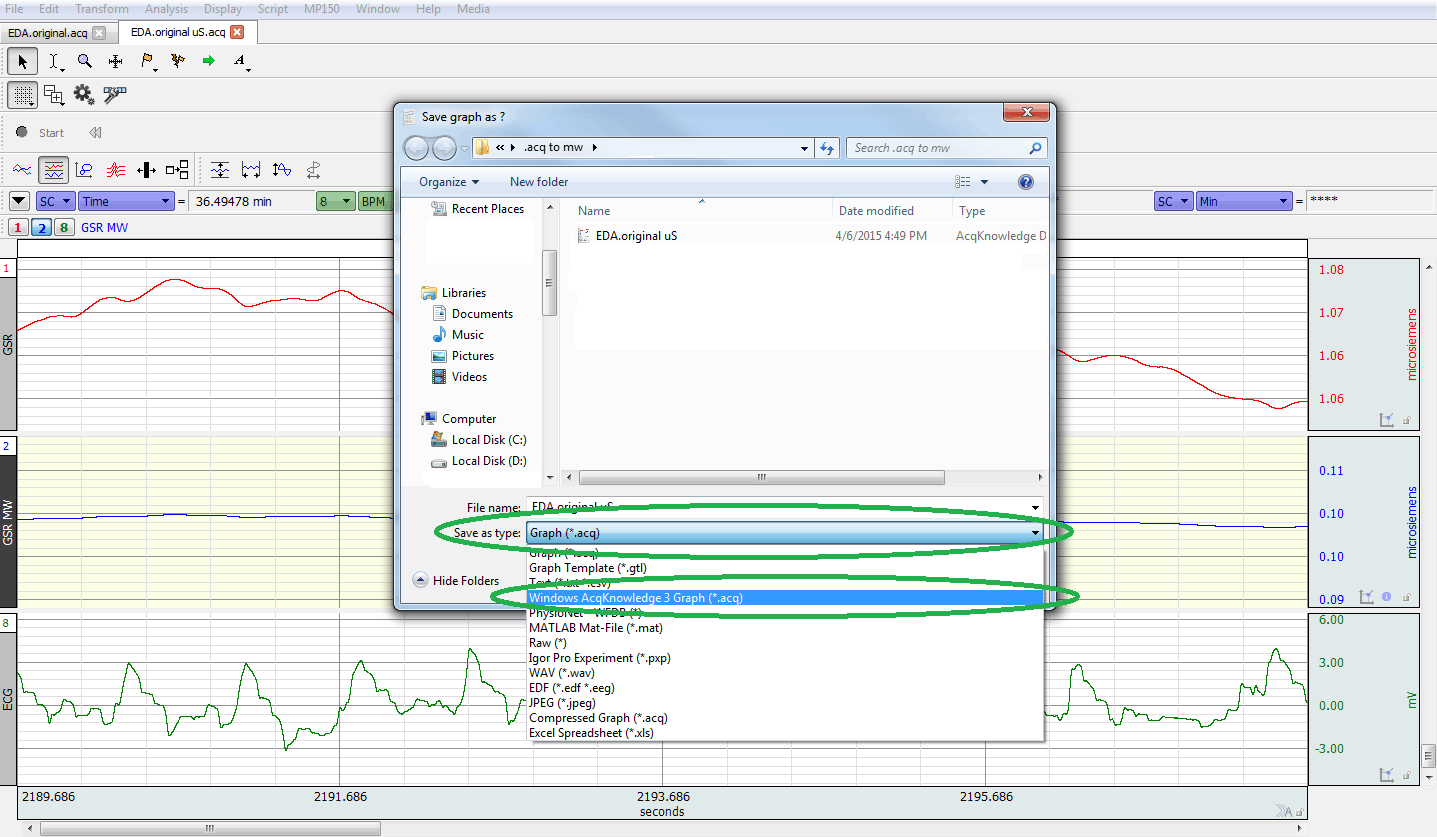
Name the file in such as way as to distinguish it from the previous AcqKnowledge file, and press OK. This AcqKnowledge file is now ready for use in the MindWare analysis applications.
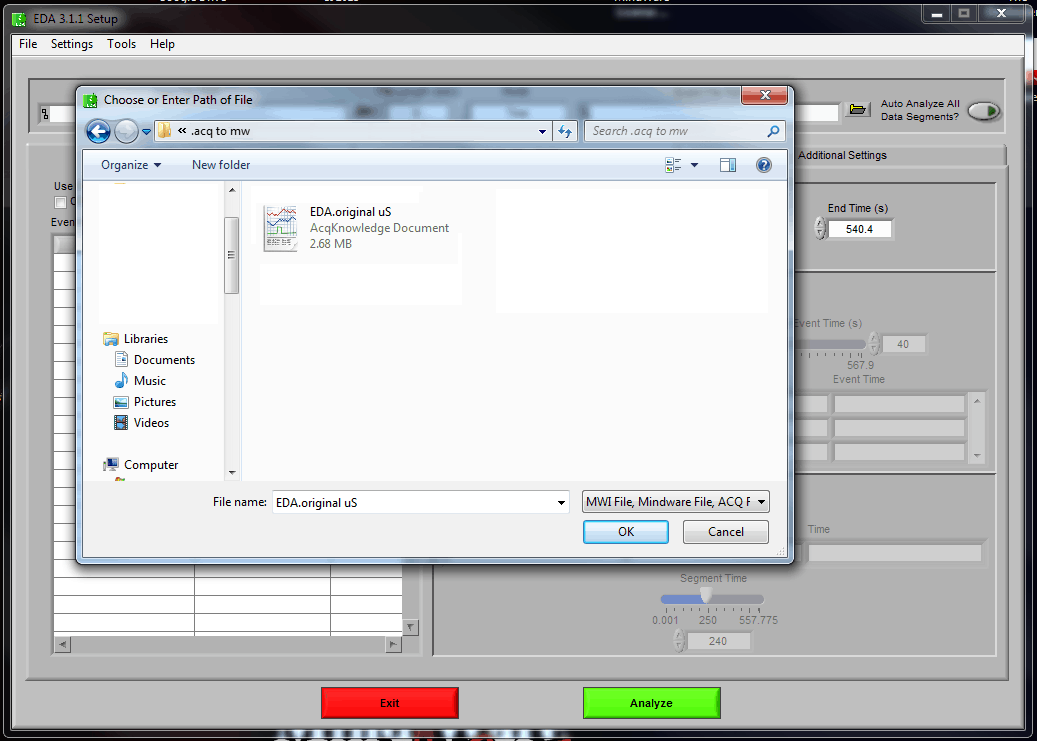
Step 6: Opening the AcqKnowledge file in MindWare
Load the file into the MindWare application the same way you would load any other file.
On the “Map Channels” screen, be sure to map the duplicated channel for analysis.
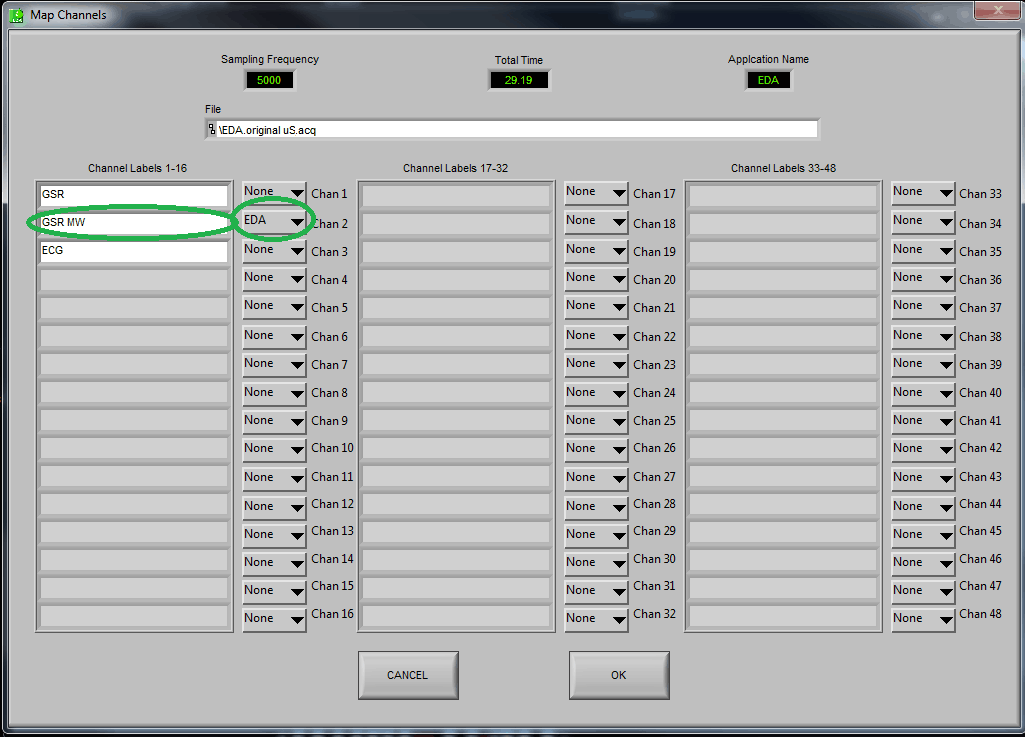
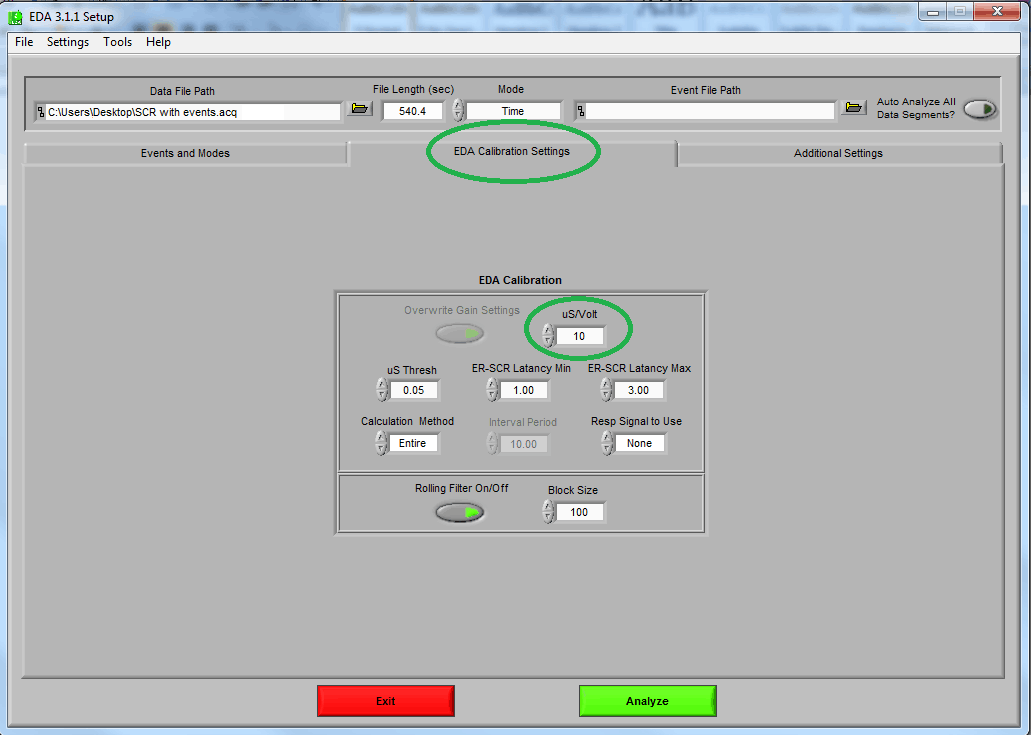
When the channel needs to be scaled into appropriate units, be sure to enter the scaling value from AcqKnowledge in the appropriate setting in MindWare. Using the GSR channel from the above AcqKnowledge file as an example, we would select the “EDA Calibration Settings” tab and change the “uS/Volt” setting to 10.
This process will vary slightly from application to application, but the general concept remains the same.
The MindWare analysis applications have the ability to open AcqKnowledge (.acq) files directly, but there are two steps which must be taken for them to open properly:
- The data must be viewed in seconds, rather than absolute time or frequency
- The file must be saved as an AcqKnowledge 3 Graph
This article will provide instructions on how to modify your AcqKnowledge files to meet these criteria.
Step 1 – Set Horizontal Axis
The Horizontal Scaling settings in AcqKnowledge affect the way the sample rate is stored in the file. To read the file properly in MindWare, the horizontal scale must be shown in seconds. To change this, navigate to the Display menu and select “Horizontal Axis…”.
On this screen, ensure that the Horizontal Scaling is set to “Time (ss.sss)” and press OK.
Step 2 – Save the file as an AcqKnowledge 3 Graph:
If you are using AcqKnowledge 3.9 or earlier, you can skip this step.
MindWare analysis applications cannot open the default file type created by AcqKnowledge 4.0 or newer, however there is an option to save these files in the older AcqKnowledge 3 file format.
Navigate to the File menu and select “Save As…”. Click on the drop down menu for “Save as type:” and select “Windows AcqKnowledge 3 Graph (*acq)”.
Name the file in such as way as to distinguish it from the previous AcqKnowledge file, and press OK. This AcqKnowledge file is now ready for use in the MindWare analysis applications.