This article will provide step-by-step instructions on how to scale the blood pressure readings in BioLab so that it matches the systolic and diastolic readings on the CNAP blood pressure unit.
Equipment Setup
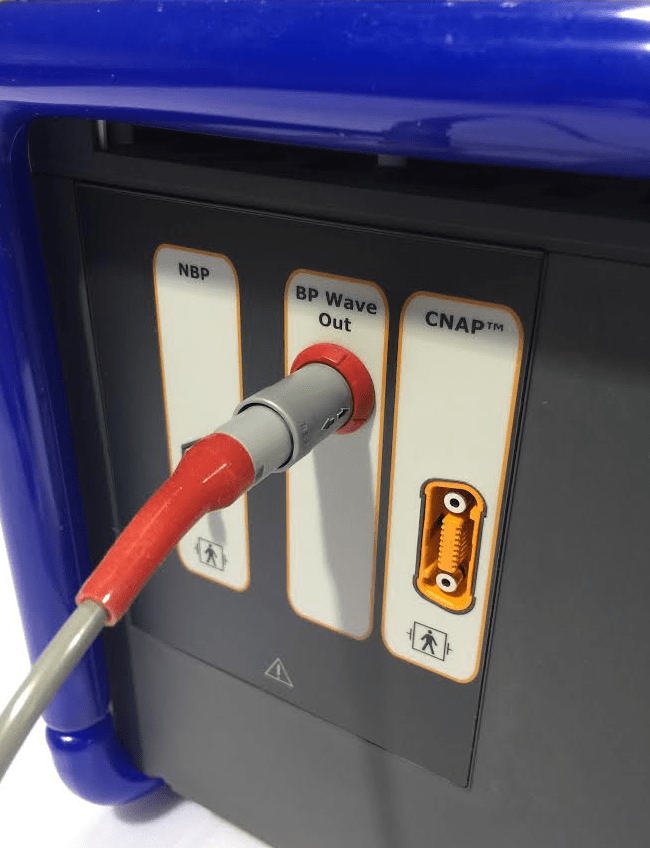
Step 1: Connect the CNAP Monitor Adapter (45-0036-00) into the 4-Channel Transducer module in the BioNex unit, as illustrated.


Step 2: Connect the other end of the CNAP Monitor Adapter to the CNAP Monitor’s “BP Wave Out” jack, as illustrated.
Producing a Calibration Square Wave on the CNAP Unit
The following steps are used to generate a calibration square wave on the CNAP Monitor. This will be used to generate a consistent reading from the CNAP, which will be used in BioLab to scale the blood pressure reading.
Step 1: With the CNAP Monitor powered on press “Setup”.
Step 2: Using the middle knob scroll the cursor to “Service” and press the knob in to select.
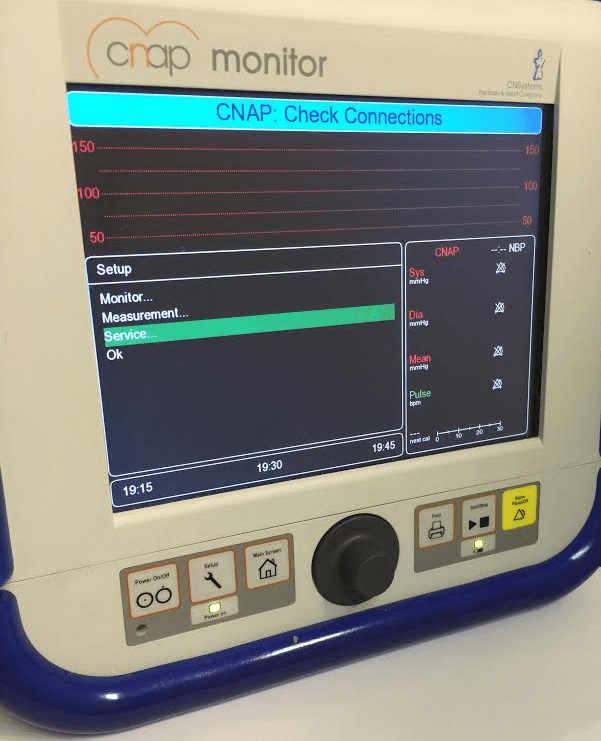
Step 3: Using the middle knob enter in the default password for the unit: 8737. Press “Ok” when finished (It is not recommended to change this password).
Step 4: Scroll and highlight “Function Tests” and press the knob in to select.
Step 5: Scroll and highlight “Check Up IBP” and press the knob in to select.
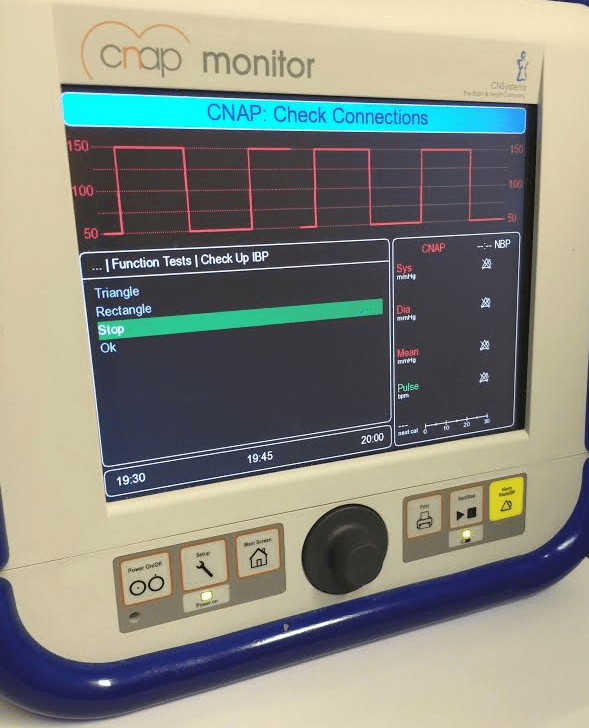
Step 6: Scroll and highlight “Rectangle” and press the knob in to select.
Step 7: A square wave will be visible on the CNAP with a max of 150 and a min of 50. Leave the unit alone at this point and proceed to the next section.
Scaling BioLab to the CNAP Blood Pressure Output
The following steps are used to scale the CNAP’s systolic and diastolic readings in BioLab.
Important Note: Do not use values from one transducer channel on other transducer channels, because they could be slightly different (i.e. Do not use the channel 1 values on channels 2, 3, or 4, ). Repeat the following steps whenever you change transducer channels.
Important Note: Do not plug the CNAP Monitor Adapter in any other module besides the 4-Channel Transducer module.
Step 1: In BioLab, turn on the transducer channel where the CNAP Monitor will be used on, and press the blue preview button in the right column.

Step 2: Set “Channel Gain” to 100. Set “Scaled Unit” from volts to mmHg. Set “Scaling Method” to Map Ranges. Make sure “Filter Type” and “Wavemath Type” are set to None. Use the picture below as a reference.
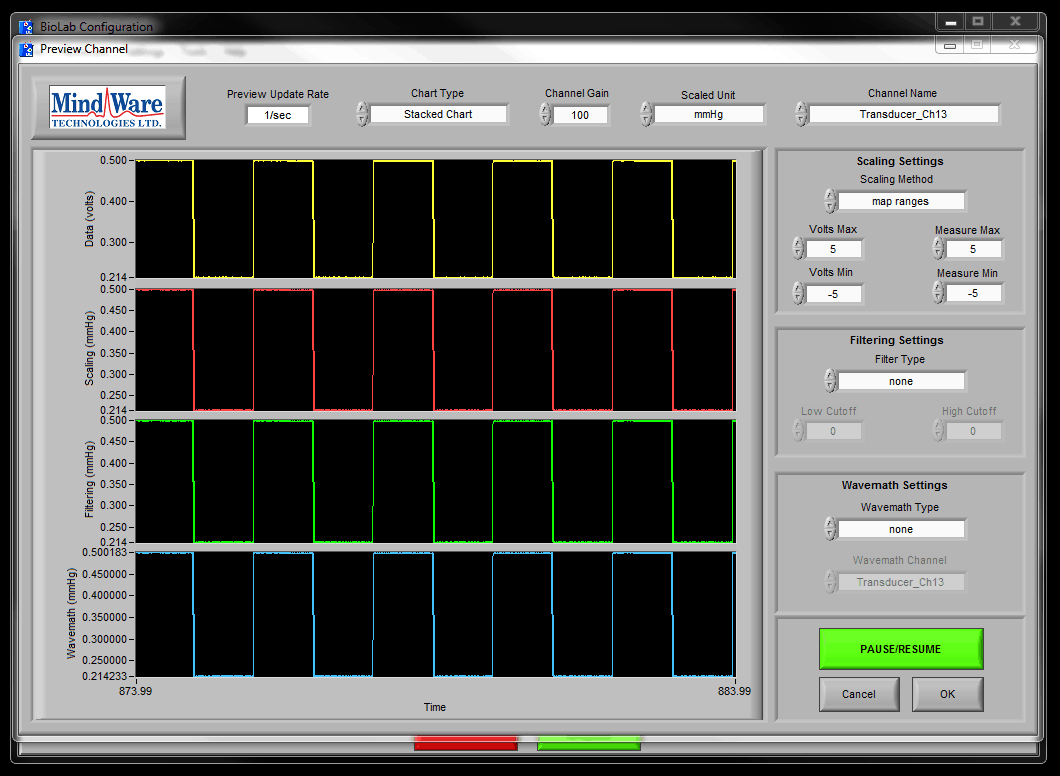
Step 3: Next, in “Scaling Settings” adjust the Volts Max and Volts Min fields. Using the yellow “Data (volts)” graph, take note of the max and min values. In this instance the Volts Max is 0.500, and the Volts Min is 0.214. In “Scaling Settings” put these volts max and min values in the Volts Max and Volts Min fields.
After this adjust the Measure Max and Measure Min fields: The CNAP is producing a max value of 150 mmHg and and min value of 50 mmHg. In “Scaling Settings” set the Measure Max to 150 and the Measure Min to 50. Refer to the image below. The red “Scaling (mmHg)” graph is now showing a max and min value similar to what the CNAP unit is showing.
Important Note: If the channel gain in BioLab is changed from 100, this will result in different Volts Max and Volts Min values.

Step 4: Next, exit out of the CNAP square wave setting by pushing “Main Screen” on the CNAP unit. Subject recordings will now be calibrated to mmHg. Either make note of the scaling settings or save a BioLab configuration to prevent losing the calibration between sessions.
Important Note: It is recommended to do this process periodically to ensure accuracy.